Guides
How to Set Up AI Grading in Moodle: The Complete Guide With Screenshots
October 2026 · 12 min read · By Proctor AI Team
This guide takes you from nothing to your first AI-graded Moodle assignment. Part 1 is for the person who looks after your Moodle site. Part 2 is for teachers. Part 3 covers what students see. If you are both the administrator and the teacher, which is common in smaller schools, just read it top to bottom.
Part 1: Setting up the plugin (administrators, about 15 minutes)
Step 1: Download the plugin
Go to our Moodle plugin page and click Download the plugin. You get a ZIP file called assignfeedback_proctorai followed by the version number. Don't unzip it. Moodle wants the ZIP as it is.
Step 2: Install it in Moodle
- Log in to Moodle as an administrator.
- Go to Site administration, then Plugins, then Install plugins.
- Drag the ZIP file into the box, or click Choose a file and pick it.
- Click Install plugin from the ZIP file. Moodle checks the file and shows a validation page. Click Continue.
- On the next page click Upgrade Moodle database now. When it says Success, click Continue.
Step 3: Create an API key in Proctor AI
The API key is how Moodle proves it is allowed to use your Proctor AI account. Sign in at agent.proctorai.io, open Settings, then the API keys tab, and create a key. Copy it straight away: Proctor AI shows the full key only once. If you lose it, revoke it and make a new one.
If you just want to try things out, create a test key instead of a live one. Test keys start with pai_test_. Everything works the same, but every answer gets the same sample marks and nothing is ever charged. It is the safest way to check your setup before real students are involved.
Step 4: Connect Moodle to Proctor AI
In Moodle go to Site administration, Plugins, Activity modules, Assignment, Feedback plugins, Proctor AI grading. Paste the key into API key and leave API URL as it is. Then read the text next to Allow sending student work to Proctor AI and tick it. This is your school's consent: until it is ticked, the plugin sends nothing at all. Click Save changes.
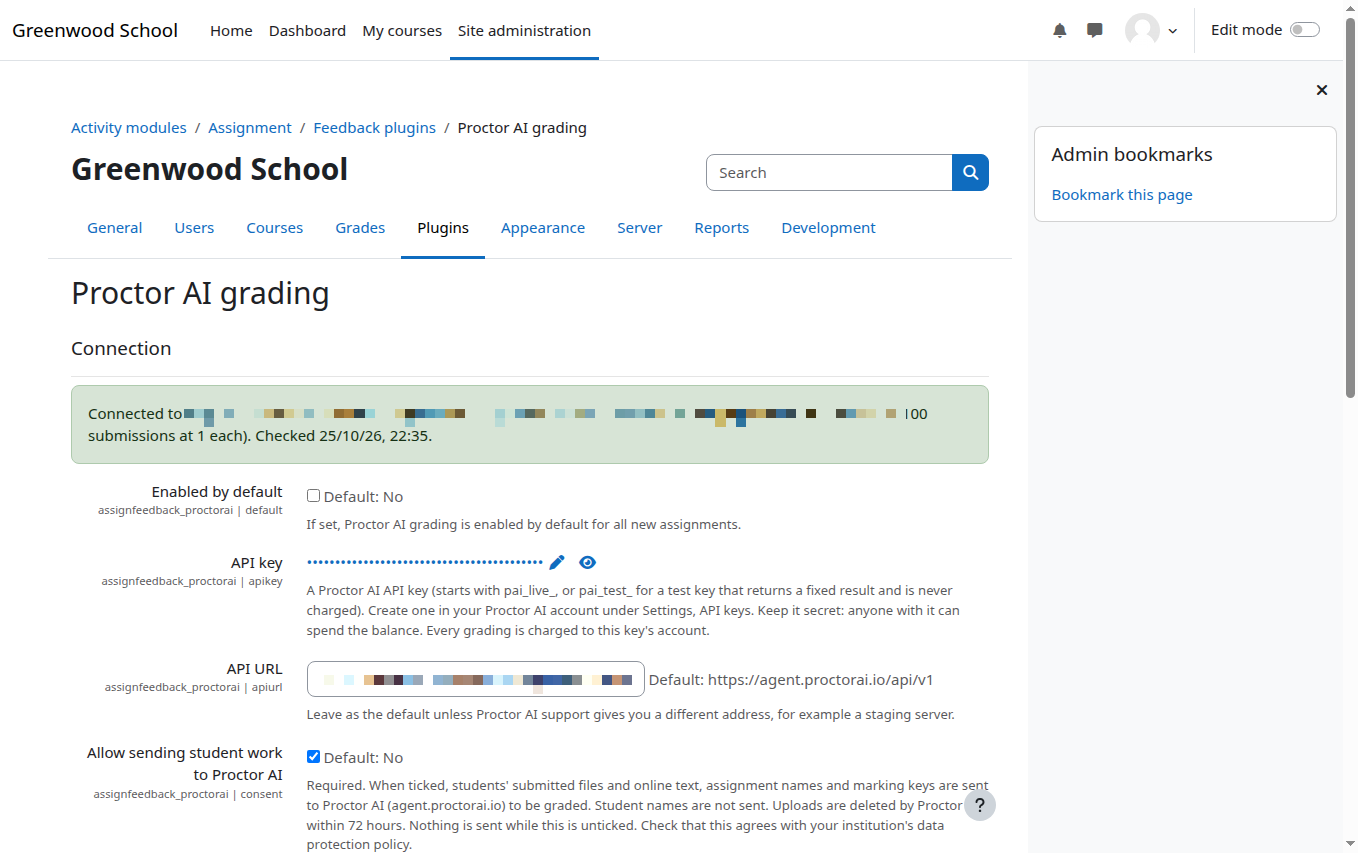
If the box at the top turns green and shows your balance, you are connected. If it says Could not reach Proctor AI, your server can't reach the internet address agent.proctorai.io. That is usually a firewall or proxy setting your IT team can open.
Step 5: Check the other settings (optional)
| Setting | Default | What it means in practice |
|---|---|---|
| Enabled by default | Off | Teachers turn AI grading on per assignment. Leave it off unless every assignment should use it. |
| Low balance warning | 20 | You get a message when the balance covers fewer than 20 submissions. |
| Attempts per submission | 5 | How often a grading is retried if the connection drops. Retries are never charged twice. |
| Grade again when resubmitted | On | With automatic grading, a changed submission is graded again (and charged again). |
| Automatic gradings per student | 3 | Stops one student who resubmits ten times from using up your balance. |
| Upload method | Direct | Leave it. Inline is only for networks that block Proctor AI's file storage. |
That's the administrator part done. Send your teachers the link to this guide, or straight to Part 2.
Part 2: Grading an assignment (teachers)
Step 6: Turn on Proctor AI grading in the assignment
Create a new assignment, or open an existing one and click Settings. Under Submission types, allow File submissions if students will upload photos or a PDF, and Online text if they will type. You can allow both. Under Feedback types, tick Proctor AI grading. A few new fields appear, the most important being the marking key.
Step 7: Write the marking key
The marking key is the AI's copy of your answer key. For each question you give the question text, how many marks it is worth and, if you can, the expected answer. The editor works one question at a time, so you don't need to learn any special format. Use Add a part for questions like 3a and 3b.
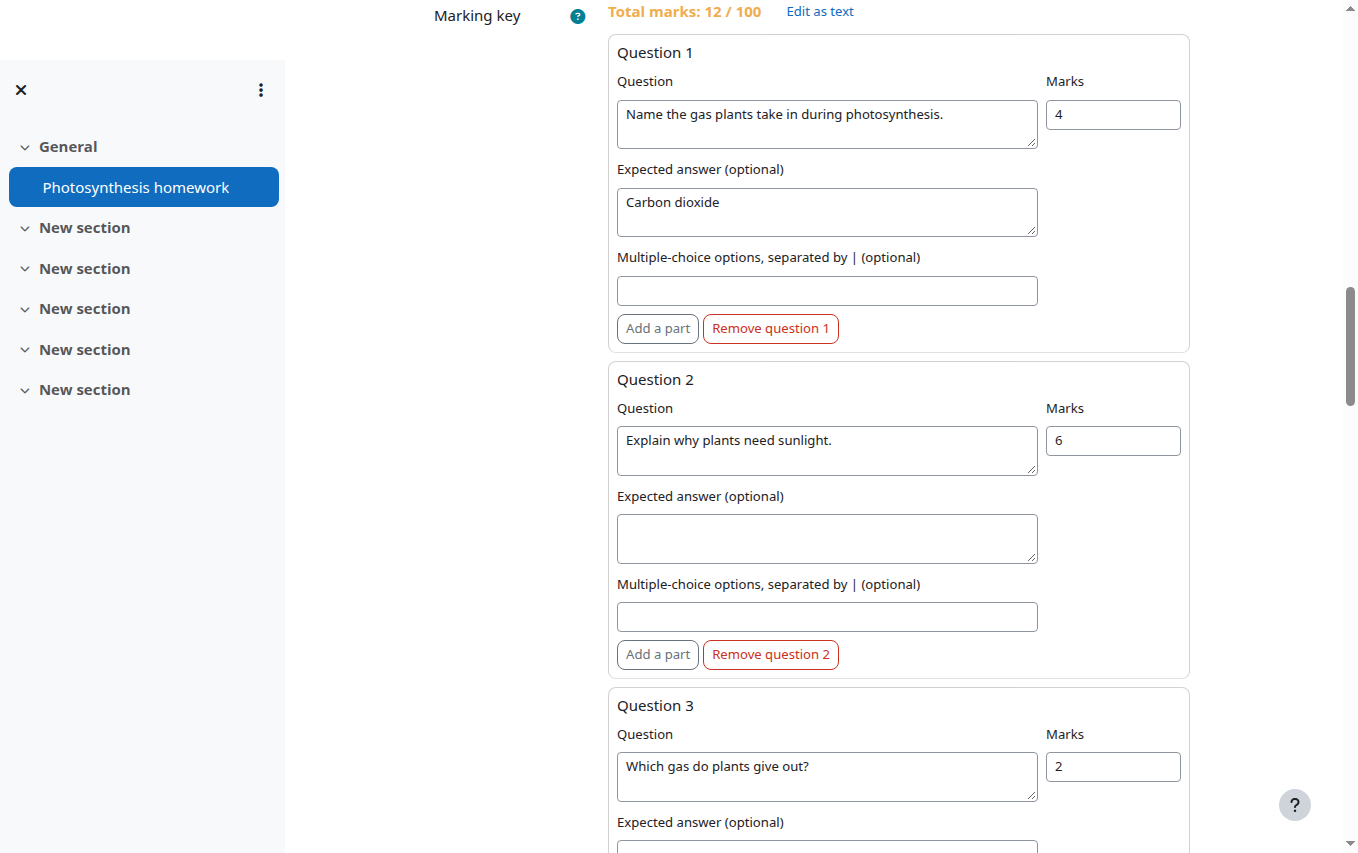
Two habits make a big difference to accuracy. First, fill in the expected answer whenever there is one, even a short one. Second, for longer answers write what earns the marks rather than a model essay: for example, names the gas (1 mark), explains why it is needed (1 mark). We wrote a whole article on this, linked at the end.
Two optional fields sit below the key. Level, such as Grade 8 or A-level, tells the AI how much depth to expect. Instructions for the AI grader is for anything else, like accept British or American spelling, or give method marks for correct working.
Step 8: Send the work to Proctor AI
Once students have submitted, go to the Submissions page. You have three ways to send their work:
- Tick some students and choose Grade with Proctor AI from the bulk actions at the bottom.
- Open the actions menu and choose Grade all ungraded with Proctor AI.
- Or, before students submit, turn on Grade automatically on submission in the assignment settings. Each submission is then sent on its own as it arrives.
For the first two, a confirmation page appears before anything is sent. It tells you how many submissions will be graded, who is left out and why (for example Not submitted), the cost per submission, the total, and your balance.
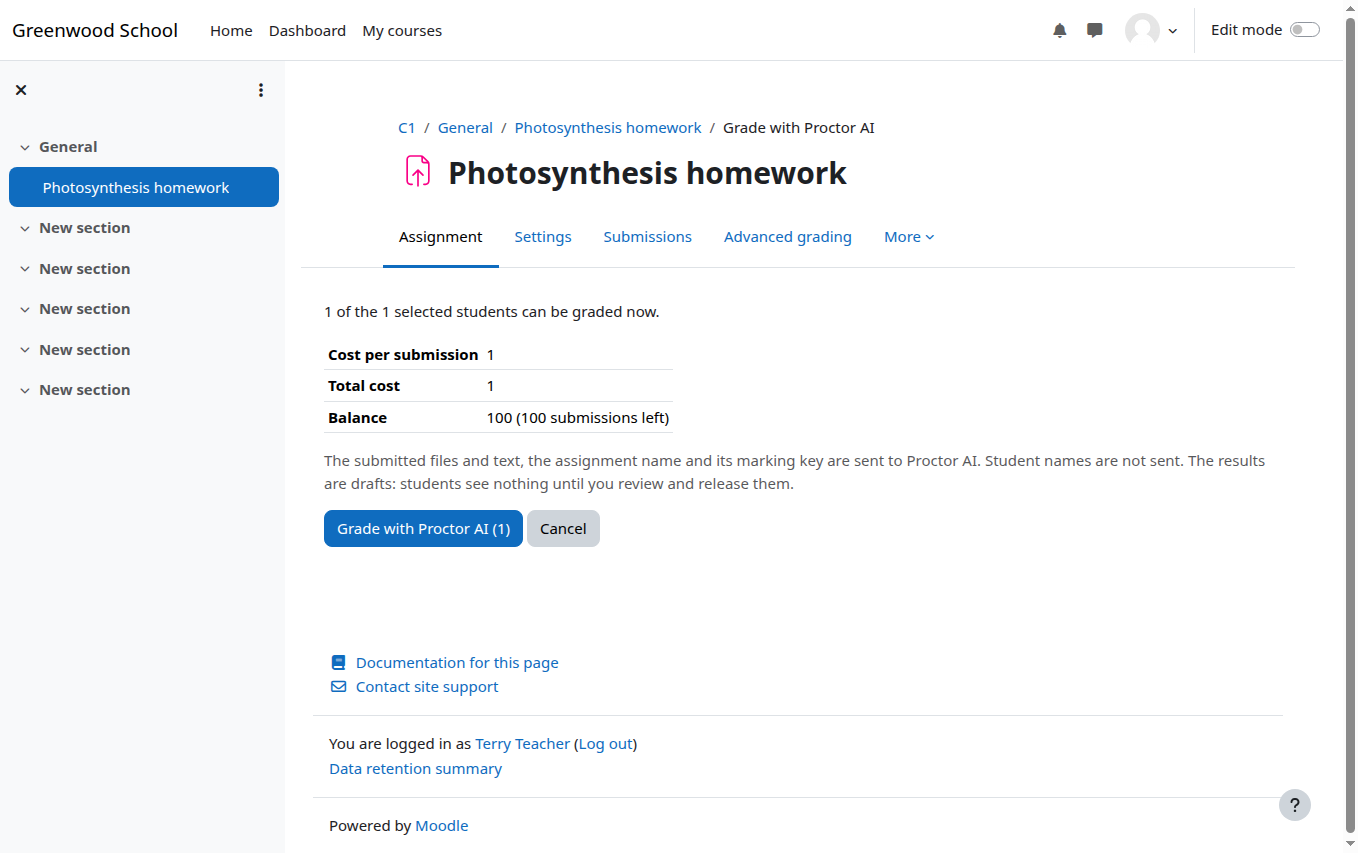
Grading happens in the background, usually within a couple of minutes per submission. You can close the page. Moodle sends you a notification when the whole batch is done.
Step 9: Check the AI's marks
Open a student in the grader. Under the grade box you'll find the Proctor AI grading panel. At the top is the AI total and a note like 1 to check. Below that is a row for every question with the mark, what the AI read from the student's page, why it gave that mark, and how confident it is. Rows it is unsure about are highlighted. Start with those.
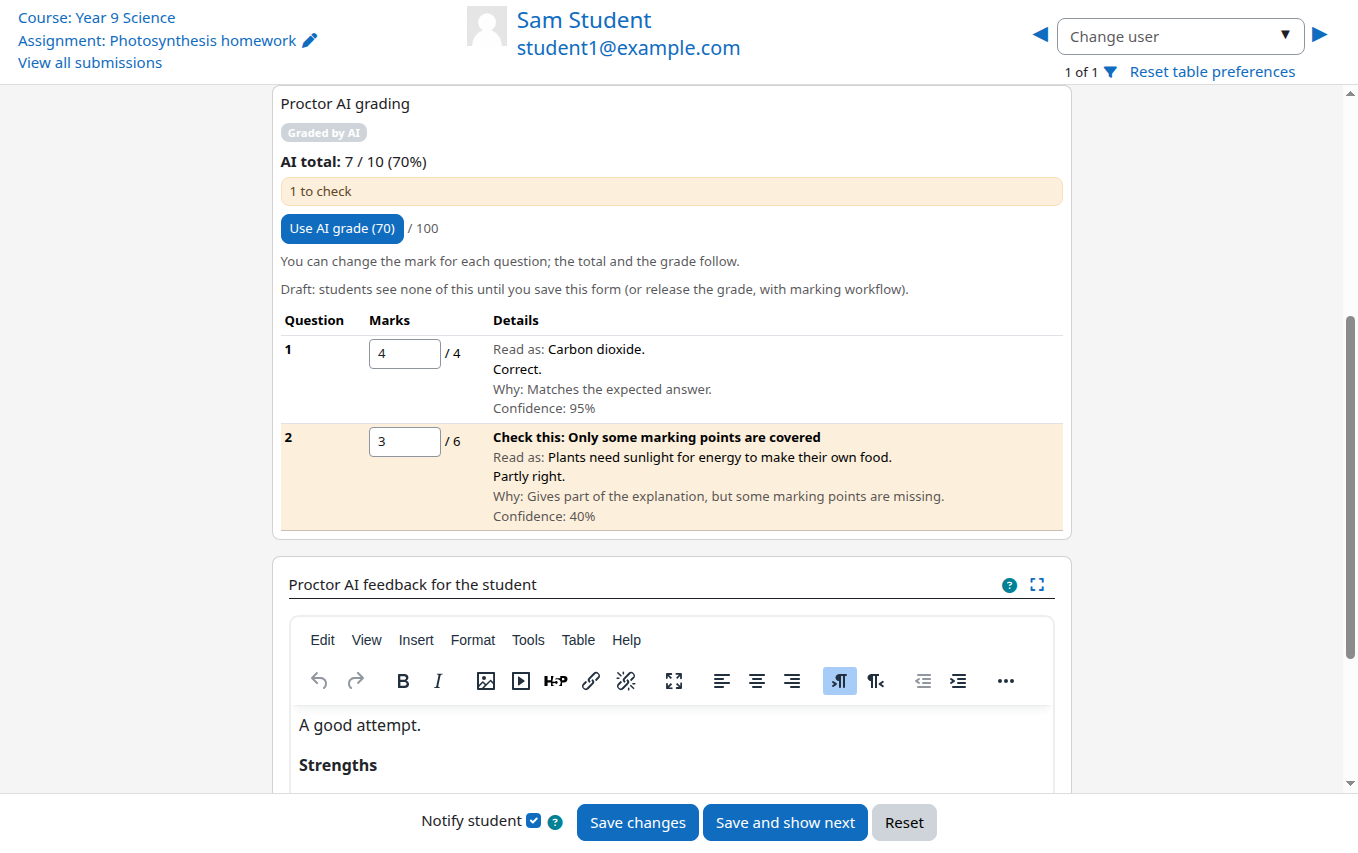
Change any mark you disagree with. Click Use AI grade to copy the total into Moodle's grade box. Edit the feedback in the box called Proctor AI feedback for the student. It is written by the AI from the result and it is yours to rewrite. Then click Save changes or Save and show next.
Step 10: Release the marks
What happens next depends on whether your assignment uses marking workflow (Settings, Grade, Use marking workflow).
- With marking workflow, the AI grade is filled in as a draft and the student is set to Ready for review. The gradebook stays empty. When you are happy, set the workflow state to Released, one student at a time or in bulk.
- Without marking workflow, the AI result is only a suggestion. Saving the grader form gives the student their grade. To do many at once, select students and choose Apply Proctor AI marks from the bulk actions. Grades you entered yourself are never changed.
Step 11: Keep an eye on things with the status page
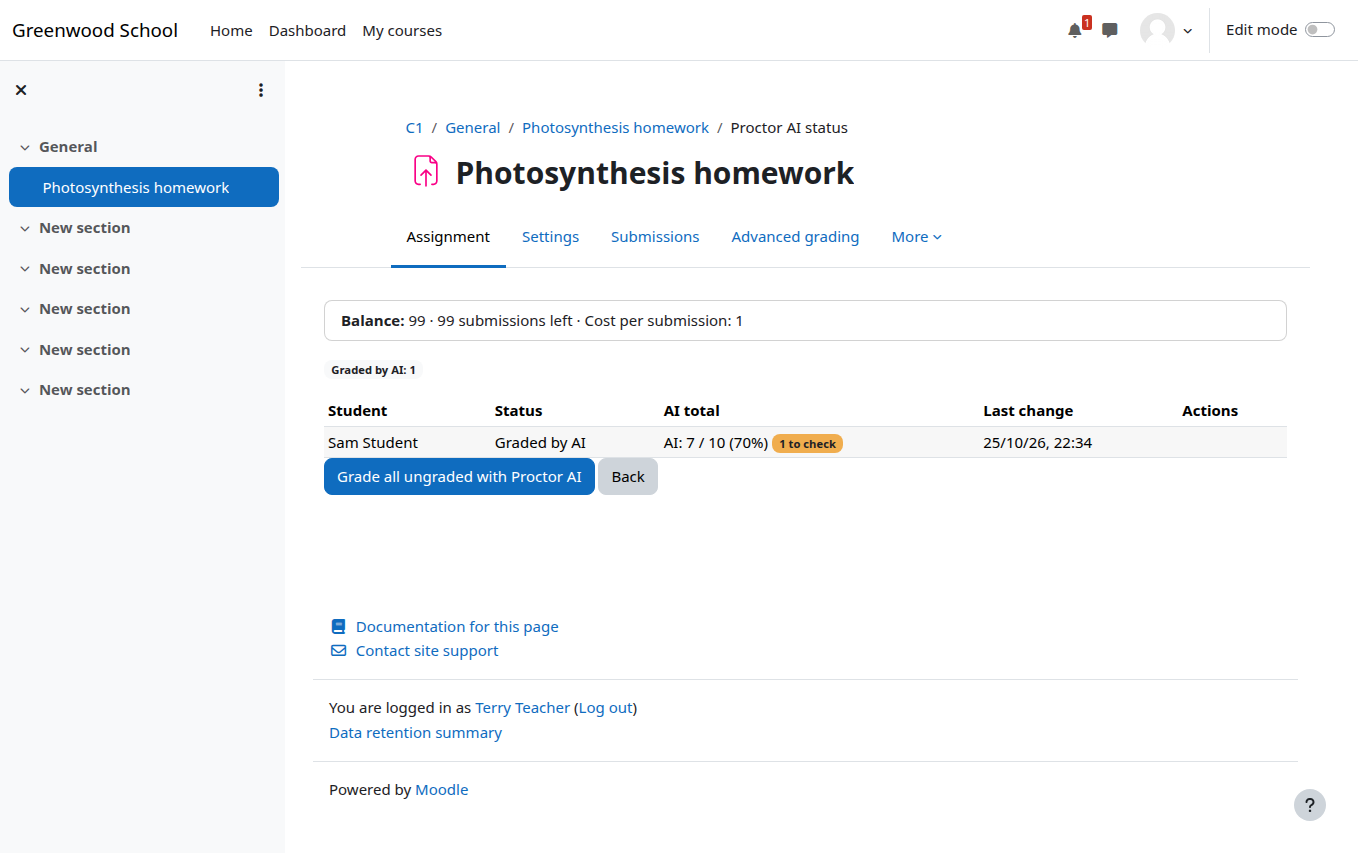
On the Submissions page, open the actions menu and choose Proctor AI status. It lists every student with where their grading is up to, the AI total, and buttons to Retry or Cancel. If the balance ran out halfway through a batch, Retry everything stopped by the balance picks up where it stopped after a top-up.
Part 3: What students see
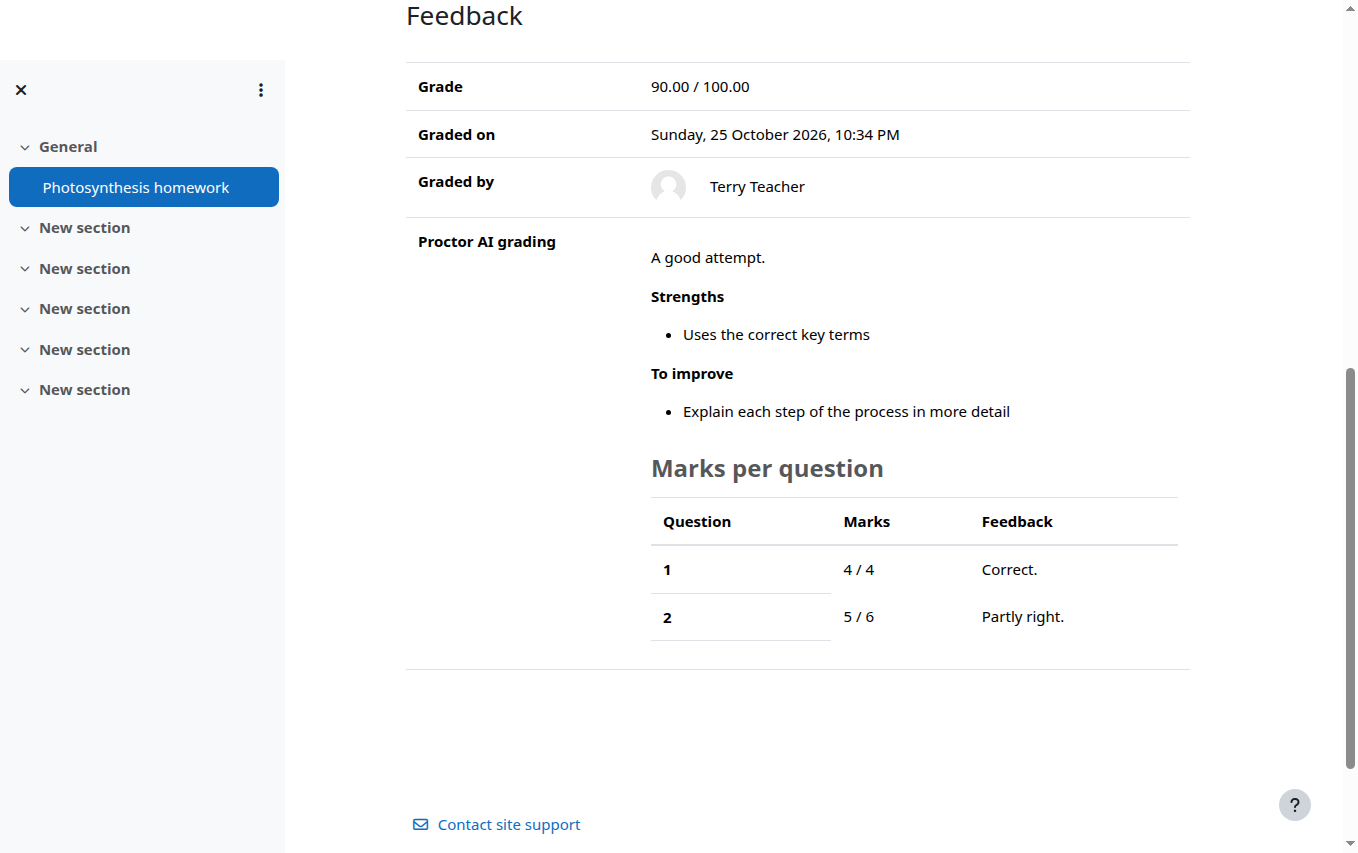
Students don't need to do anything new. They submit photos, a PDF or typed text as usual. They see nothing from the AI until you release the grade. Then, under Feedback on the assignment page, they see their grade, your feedback and a table of marks per question.
Clear photos make a real difference. One photo per page, in daylight, taken from straight above, with the question numbers written next to each answer.
What it costs
The plugin is free. Each submission Proctor AI grades is paid from your prepaid Proctor AI balance, and the price per submission is shown on the settings page and on every confirmation page. A group submission is charged once for the whole group. You are not charged when a grading fails, when a page can't be read, when there are more than 20 pages, when a grading is cancelled before it starts, or when the plugin retries after a network problem.
When something goes wrong
| What you see | What it means | What to do |
|---|---|---|
| Proctor AI is not set up on this site yet | No API key, or consent not given | An administrator finishes Part 1, steps 3 and 4. |
| Proctor AI grading is paused | The API key was rejected, often because it was revoked | Save a valid key. Everything that was waiting is graded automatically. |
| Not graded: balance ran out | The account ran out of balance mid-batch | Top up, then Retry everything stopped by the balance on the status page. |
| Not sent to Proctor AI, so not marked | A file was a Word document, too big or empty | Mark that page yourself, or ask the student for a photo or PDF. |
| Waiting for AI grading for a long time | Moodle's background tasks (cron) are not running | Ask your administrator to check cron. |
| The marking key has an error | A line in the key is not in the expected format | Open the assignment settings: the key shows which line to fix. |
Frequently asked questions
How long does it take to set up AI grading in Moodle?
About 15 minutes for the administrator to install and connect the plugin, and a few minutes per assignment for the teacher to write the marking key.
Can I try it without paying?
Yes. Create a test key in your Proctor AI account. It works like a live key but returns sample marks and is never charged.
Do students see the AI marks before I check them?
No. With marking workflow the grade stays a draft until you release it. Without it, students see nothing until you save the grade or apply the marks.
Can the AI read handwriting?
Yes. Students can upload photos or a scanned PDF of up to 20 pages. The grader panel shows what the AI read from each answer, so you can check it.
Does it work with rubrics?
For assignments that use a rubric, marking guide or scale, the AI result is shown as a percentage to guide you while you fill in the rubric yourself.